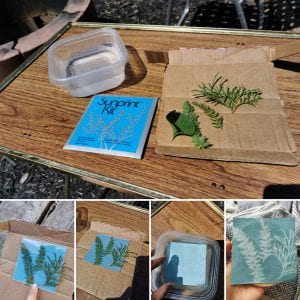
Hi there, today I’m going to show you how to make a Sunprint, which is also called a cyanotype. A cyanotype is an old fashioned type of photography that uses the sun and shadows to create an image. You can buy a kit like the one in my photo collage above, or you can use two chemicals, potassium ferrocyanide and ferric ammonium citrate (usually you can buy these at art stores or online).
Materials:
- Sunprint paper (or sturdy paper and cyanotype chemicals)
- Piece of clear glass or plastic
- Piece of cardboard
- Object(s) to make a print of (leaves, flowers, photo negatives)
- Bucket of clean water big enough for your print
- Timer
- A nice sunny day
Step 1: Get all your materials together and ready to go. Don’t take out the print paper until you’re ready to put it all together though. Collect leaves or other objects with interesting shapes to make a print. I choose yarrow and cedar leaves from my yard because they have lots of texture. Put your bucket of water outside where you’re going to make the print.
Step 2: In the shade or inside your house, set down your cardboard on a sturdy surface like a table ot the floor.
Step 3: Take out your print paper and put it blue side up on the cardboard. Arrange your objects on the paper the way you want them to look. If you think this might take you some time, decide before you take out the paper.
Step 4: Put the glass or plastic square on top of your object, and when your ready, hold it all together like a sandwich and take it outside to where you have your bucket of water.
Step 5: Set the whole thing in the brightest spot you can, and set a timer for 5 minutes. You might not need this long but this is the longest that you want to leave it.
Step 6: Watch your print carefully. When the parts of the paper that aren’t covered become a very light blue, almost white, your print is ready! In bright sunlight it might only take a minute or two.
Step 7: Quickly take the stuff off the paper and put the print in the water. Gently rinse it off with your fingers.
Step 8: Set it somewhere to dry. If it’s a windy day you might want to do this inside your house.
Sunprints are beautiful and fun, and you can learn a lot about science and photography when you make them! If you have a chance to try making a Sunprint this summer, they’re a great way to preserve some of the cool things you find in nature.
*Note: You can make sunprints on less sunny days, but they’ll take longer and the edges of your print won’t be as clear. If you have old family negatives, you can create an photographs using this same process, but make sure you ask permission first.
I love this post so much!!
Hello there,
I really enjoyed reading your Blog post!
I thought you included lots of detail and insturtions.
One question: How did you get your idea to make a sunprint?